A Tibetan singing bowl is one of the most accessible and powerful meditation tools you can own — but like any instrument, it rewards a little technique. Whether you are picking up a bowl for the first time or looking to deepen a practice you have already started, this step-by-step guide covers everything: how to hold it, how to play it, how to build a full session, and the most common mistakes to avoid.
Before You Begin: Setting Up Your Space
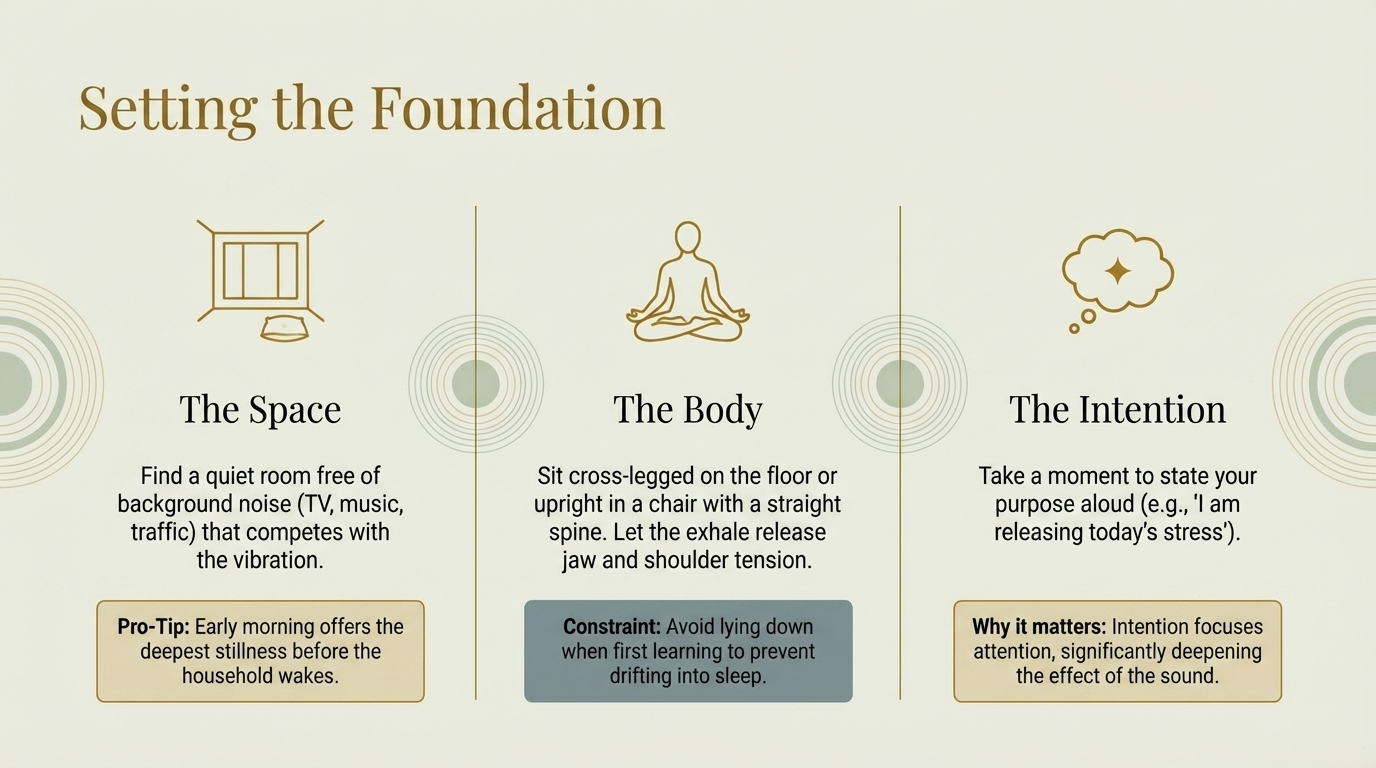
The quality of your meditation session begins before you even touch the bowl. A few minutes of preparation makes the difference between a distracted session and one that drops you into genuine stillness.
Choose a quiet space
Find a room where you will not be interrupted for at least 15–20 minutes. Turn off notifications on your phone or put it in another room entirely. Background noise — music, television, traffic — will compete with the bowl's sound and pull your attention away from the vibration.
Prepare your body
Sit cross-legged on the floor, on a cushion, or upright in a chair — whichever allows you to keep your spine straight without strain. Avoid lying down when first learning; it is easy to drift into sleep rather than meditation. Take three slow, deep breaths before you pick up the bowl. Let each exhale release any tension from your shoulders and jaw.
Set your intention
Before playing, take a moment to decide why you are sitting. It does not need to be elaborate — "I want to feel calmer" or "I am releasing today's stress" is enough. Intention focuses your attention, which significantly deepens the effect of the sound. Many practitioners simply say their intention aloud once before they begin.
Place your bowl correctly
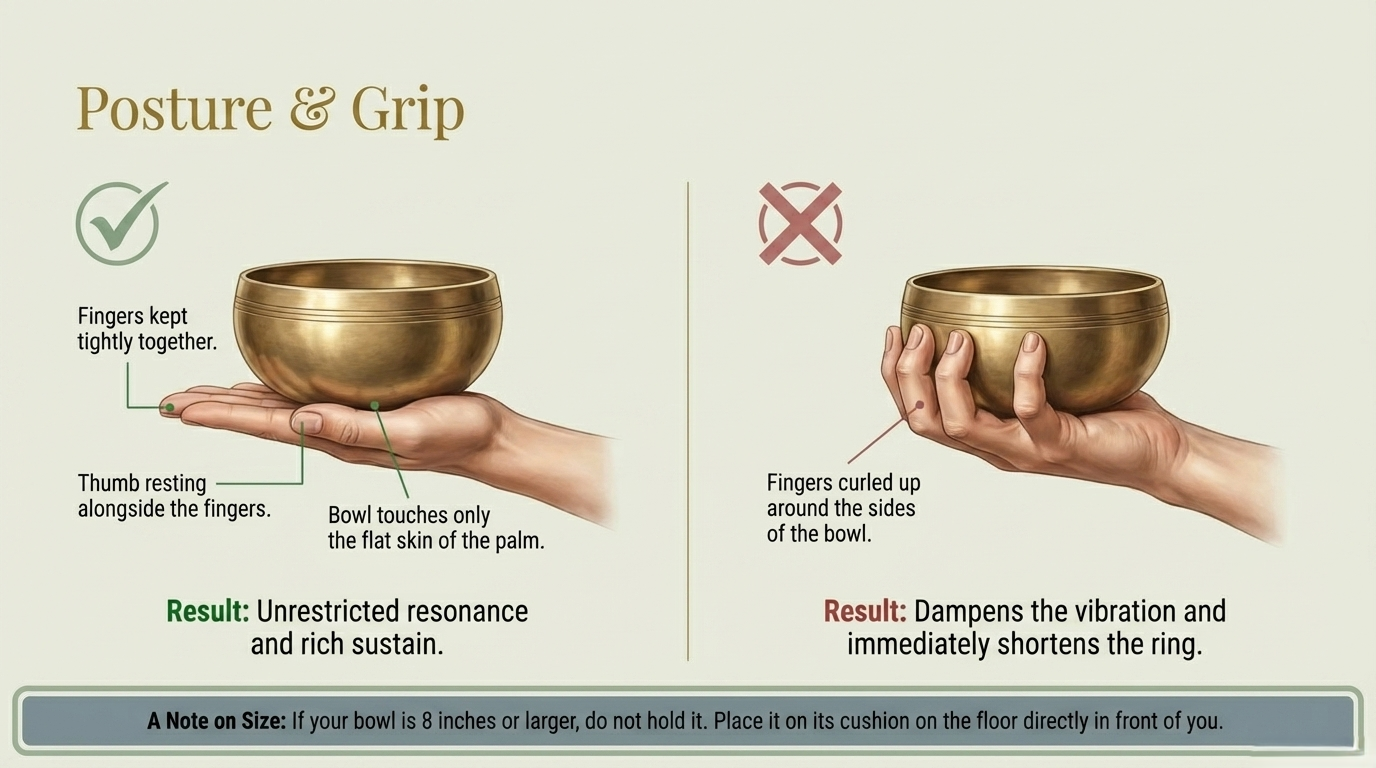
Rest the bowl on your open, flat palm — fingers together, thumb resting alongside them. Do not grip the bowl or curl your fingers up around the sides. Any contact between your fingers and the bowl's body will dampen the vibration and shorten the ring. If the bowl is large (8 inches or more), place it on its cushion on the floor in front of you rather than in your hand.
The Two Techniques: Striking and Rimming
There are two fundamental ways to play a Tibetan singing bowl. Both are useful in meditation, and most experienced practitioners use them together within a single session.
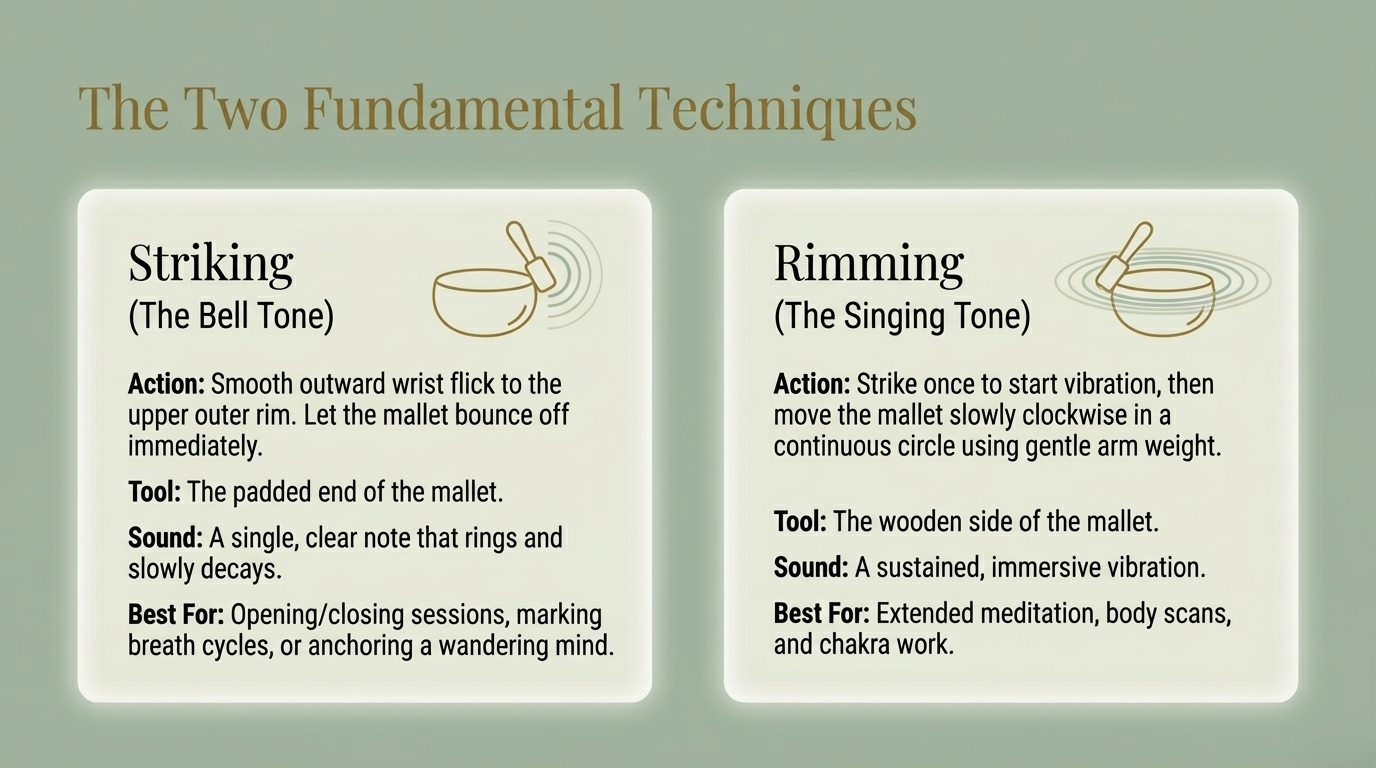
Striking produces a single, clear note that rings and slowly fades. It is the most natural starting point and requires almost no practice.
- Hold the bowl flat on your open palm
- Hold the mallet near the middle of the handle
- Strike the upper outer rim with a smooth, outward wrist motion — not a downward hit
- Let the mallet bounce off immediately — do not press it against the bowl
- Allow the note to fully decay before striking again
Rimming produces the sustained "singing" sound the bowl is named for. It takes more practice but creates the most immersive meditative experience.
- Strike the bowl once to start the vibration
- Immediately move the mallet to the outer rim
- Press gently — use the weight of your arm, not forced pressure
- Move the mallet slowly clockwise in a continuous circle
- Keep your wrist straight — the motion comes from your whole arm
"The bowl does not ask you to be skilled. It asks you to be present. The sound reveals exactly where your attention is."
— Buddha Chime Artisans, Kathmandu, NepalStep-by-Step: A Complete 20-Minute Meditation Session
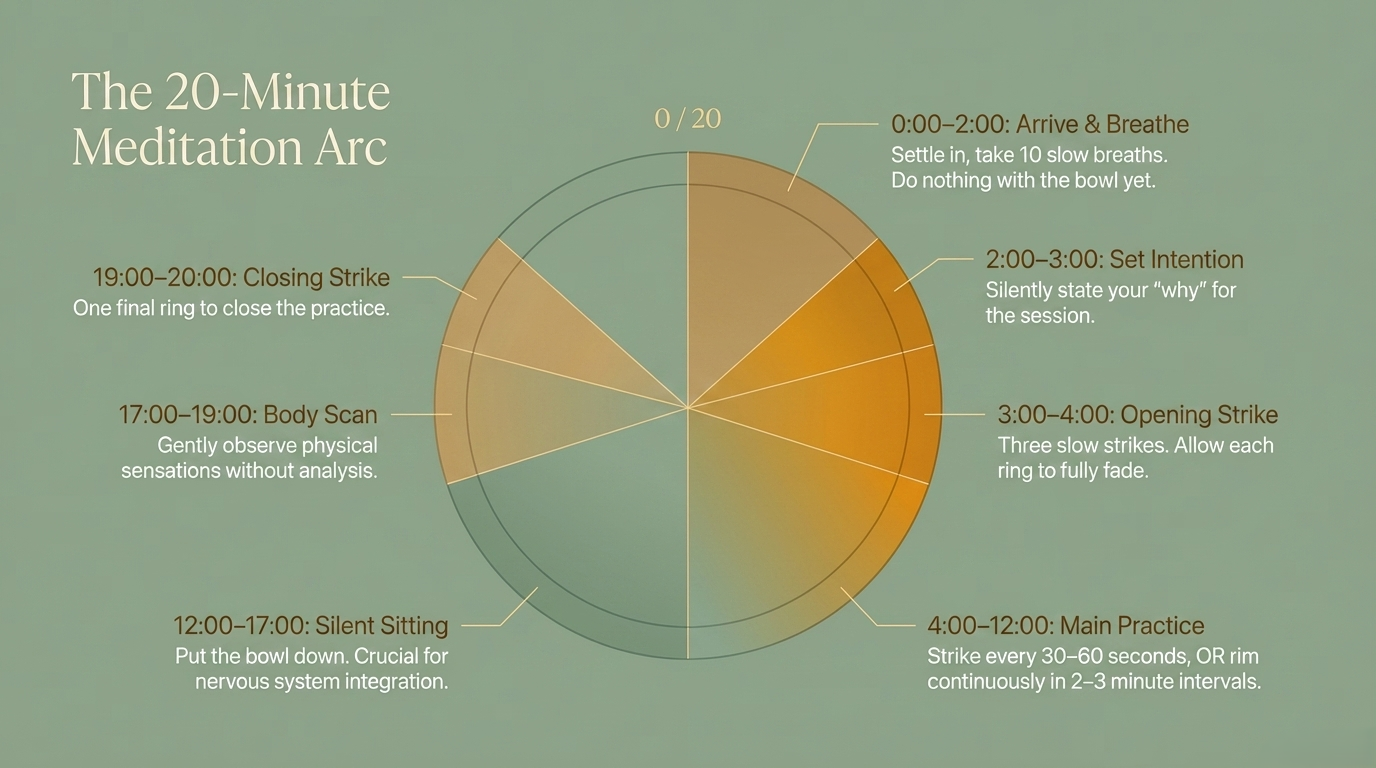
Here is a full beginner-friendly session you can follow exactly as written. With practice, you will naturally adapt it to your own rhythm.
| Time | Activity | What to Do |
|---|---|---|
| 0:00 – 2:00 | Arrive & breathe | Sit comfortably, close your eyes, take 10 slow breaths. Do nothing with the bowl yet. Let the body settle. |
| 2:00 – 3:00 | Set intention | Silently state your intention for this session. One sentence is enough. Breathe into it. |
| 3:00 – 4:00 | Opening strike | Strike the bowl three times, slowly. Allow each ring to fully fade before striking again. These three strikes mark the official beginning of your session. |
| 4:00 – 12:00 | Main meditation | Choose one approach: (A) Strike every 30–60 seconds and follow each ring into silence with your full attention. Or (B) Rim the bowl continuously for 2–3 minutes, then rest in silence for 2–3 minutes. Repeat. Follow whatever feels most natural. |
| 12:00 – 17:00 | Silent sitting | Place the bowl down. Sit in complete silence. This integration period is as important as the playing — the nervous system continues to shift after the sound stops. Do not rush this. |
| 17:00 – 19:00 | Body scan | Gently bring awareness to your body from head to toe. Notice any areas of warmth, tingling, or release. No need to analyze — simply observe. |
| 19:00 – 20:00 | Closing strike | Strike the bowl once more — a single, final ring — to close the session. Bow slightly if it feels right. Open your eyes slowly. |
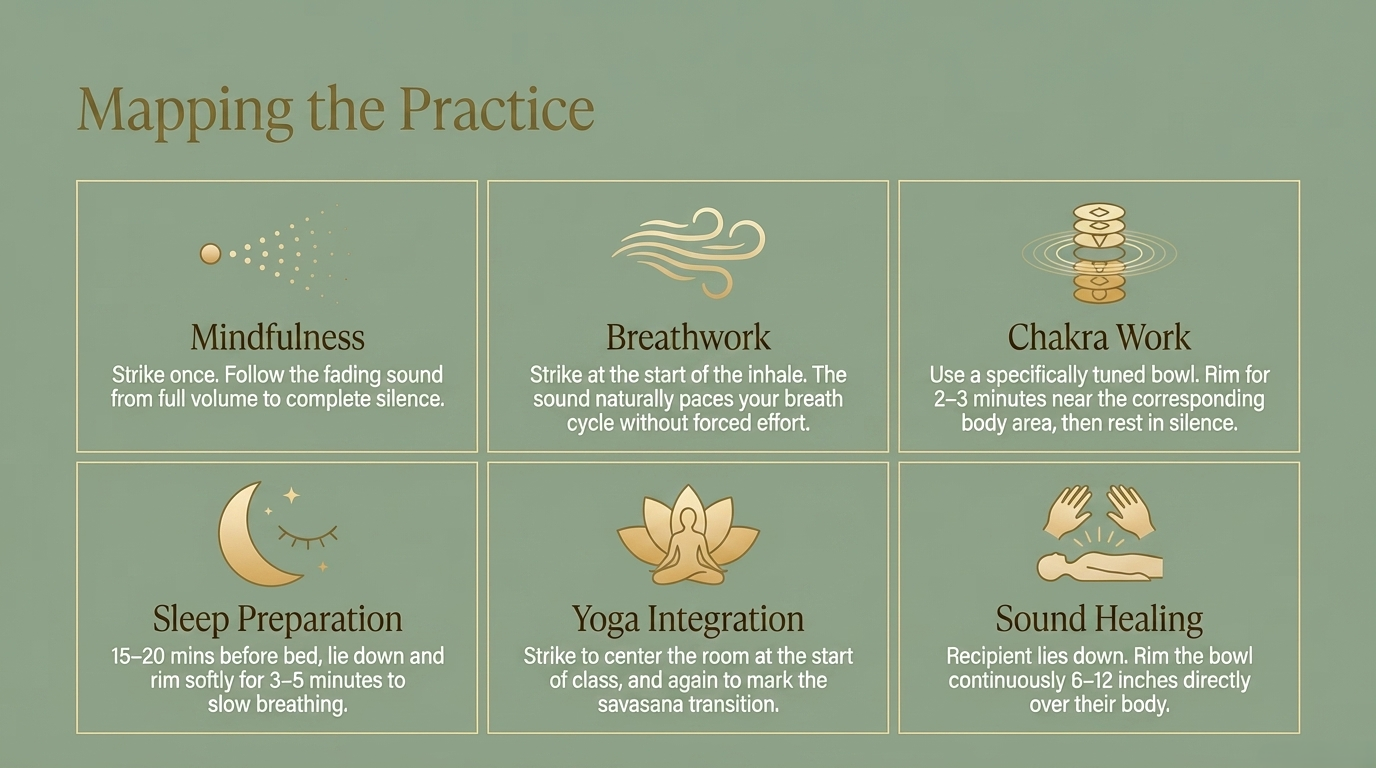
How to Use Your Bowl for Different Types of Practice
The same bowl can serve many different purposes depending on how you use it. Here are the most effective applications for each style of practice.
Mindfulness meditation
Strike once. Use the fading ring as your meditation object — follow the sound from full volume to complete silence. When the mind wanders, notice it and return to the sound. Repeat every 1–2 minutes.
Breathwork
Strike at the start of each inhale. Let the ring be the length of your breath cycle. The sound gives the breath a rhythmic anchor that deepens the practice naturally.
Chakra meditation
Use a bowl tuned to the chakra you are working with. Place it near the corresponding body area. Rim for 2–3 minutes, then place hands on that area in silence. Move upward through the chakras.
Sleep preparation
15–20 minutes before bed, lie down and rim the bowl softly for 3–5 minutes. Do not try to meditate — simply let the sound slow your breathing. Allow yourself to become drowsy.
Yoga practice
Strike at the beginning of class to center the room. Strike again at savasana. The sound gives students a clear sensory boundary that deepens their transition into stillness.
Sound healing
Have the recipient lie down with eyes closed. Move the bowl slowly over the body at a distance of 6–12 inches, rimming continuously. Focus on areas of reported tension or discomfort.
Common Mistakes and How to Fix Them
Most beginners encounter the same handful of challenges. Here is what goes wrong and exactly how to correct it.
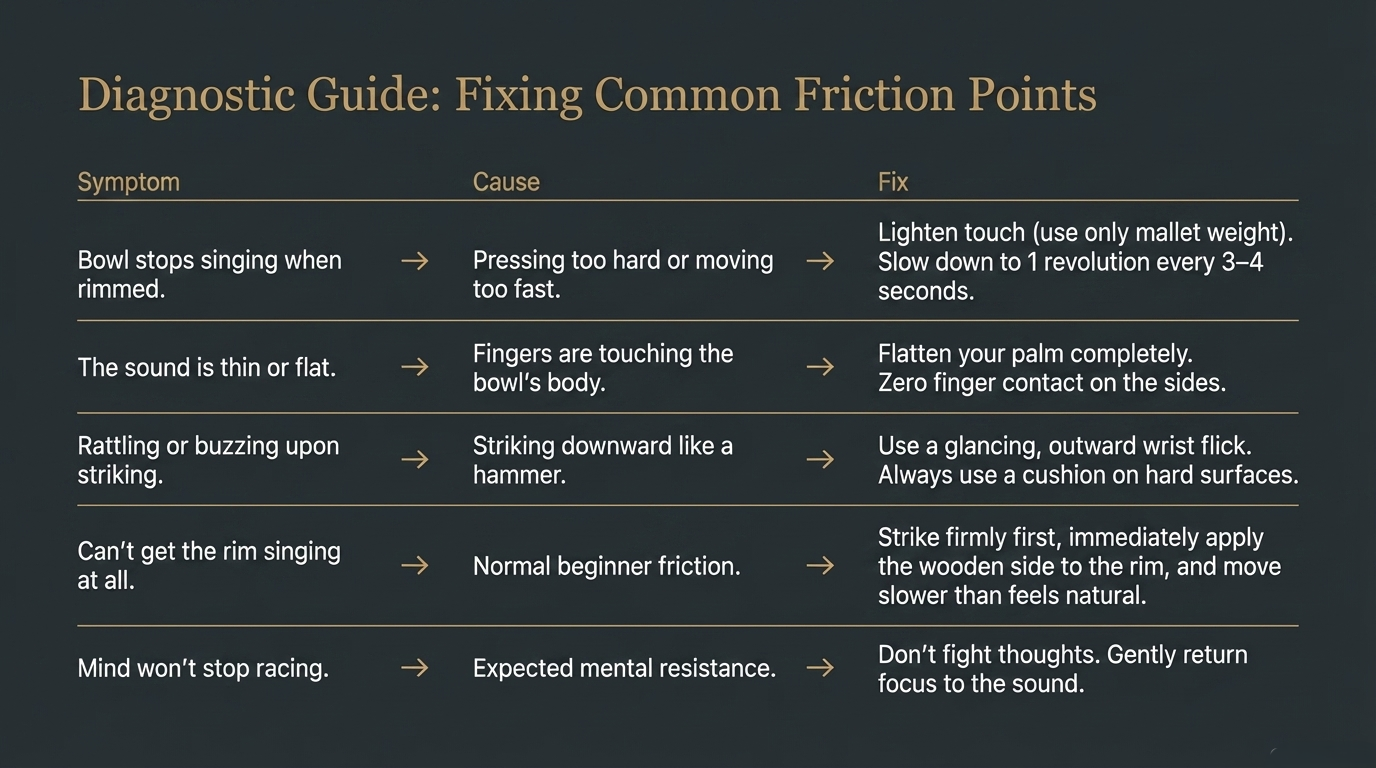
You are pressing too hard. Excess pressure dampens the vibration. Lighten your touch significantly — use only the weight of the mallet itself against the rim. Think of it as guiding rather than pushing. Also check your speed: too fast kills the tone. Slow down to roughly one revolution every 3–4 seconds.
Your fingers are touching the bowl's body. Even fingertip contact significantly dampens the ring. Flatten your palm completely — the bowl should rest only on the flat skin of your hand with no finger contact on the bowl's sides or bottom.
You are striking too hard, or striking at the wrong angle. Use a lighter, more glancing strike — the motion should be a smooth outward flick of the wrist, not a downward hammer. If the bowl sits on a hard surface, place the cushion underneath it first.
This is the most common beginner frustration, and it always resolves with patience. Start by striking the bowl firmly, then immediately place the wooden side of the mallet (not the padded end) against the rim. Move slowly — slower than feels natural. The sound will emerge within a few rotations once you find the right pressure and speed combination.
This is normal and expected — especially in the first weeks. Do not try to stop thoughts; simply redirect attention to the sound each time you notice the mind has wandered. The bowl makes this easier than silent meditation because the sound gives the mind a concrete object to return to. Each time you notice and return, that is a successful moment of practice.
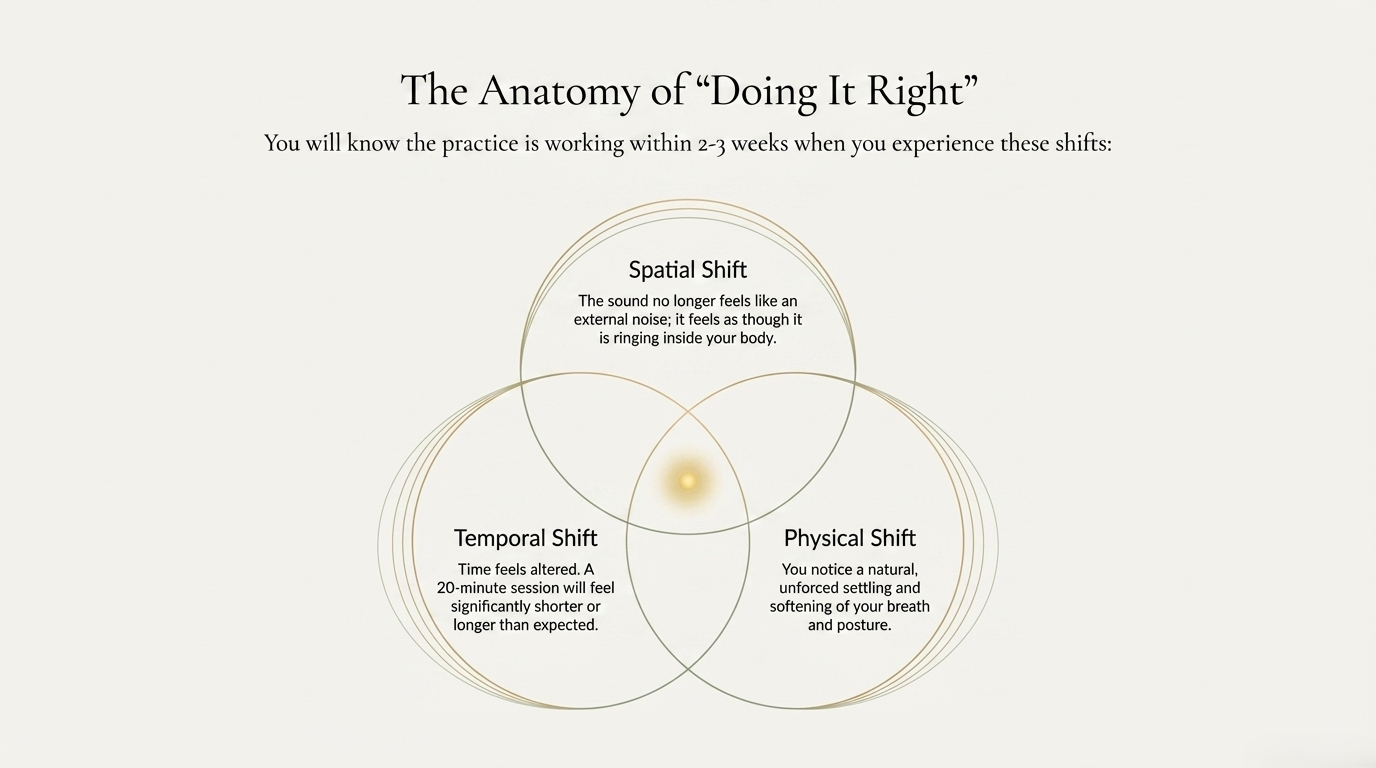
You will know the session is working when you notice: the sound feels like it is inside the body rather than outside it, time feels different (shorter or longer than expected), and there is a natural settling or softening of breath and posture. These signs appear reliably within 2–3 weeks of daily practice.
Caring for Your Singing Bowl
A well-cared-for singing bowl improves with age. The metal develops a patina that many practitioners believe deepens the tone and enriches the resonance over years of use. Basic care takes less than two minutes.
- After every session: Wipe the bowl with a soft, dry cloth to remove oils from your hands. Skin oils can dull the metal surface over time.
- Storage: Always store the bowl on its cushion — never place it directly on a hard surface. The rim is the most acoustically sensitive part of the bowl and can be damaged by hard impacts.
- Cleaning: For a deeper clean, use a soft cloth lightly dampened with warm water. Dry immediately and thoroughly. Never submerge in water or use chemical cleaners.
- The mallet: Keep the mallet dry. If the suede or felt tip becomes hardened or compacted, gently loosen it with your fingers. A worn mallet tip produces a thinner, harsher tone.
- Temperature and humidity: Avoid leaving the bowl in direct sunlight or in very humid environments for extended periods. Extreme temperature changes can stress the metal alloy.
- What not to do: Never strike the bowl with anything other than its mallet. Never place hard objects inside the bowl. Never use abrasive cloths or metal polishes — they scratch and damage the tone.
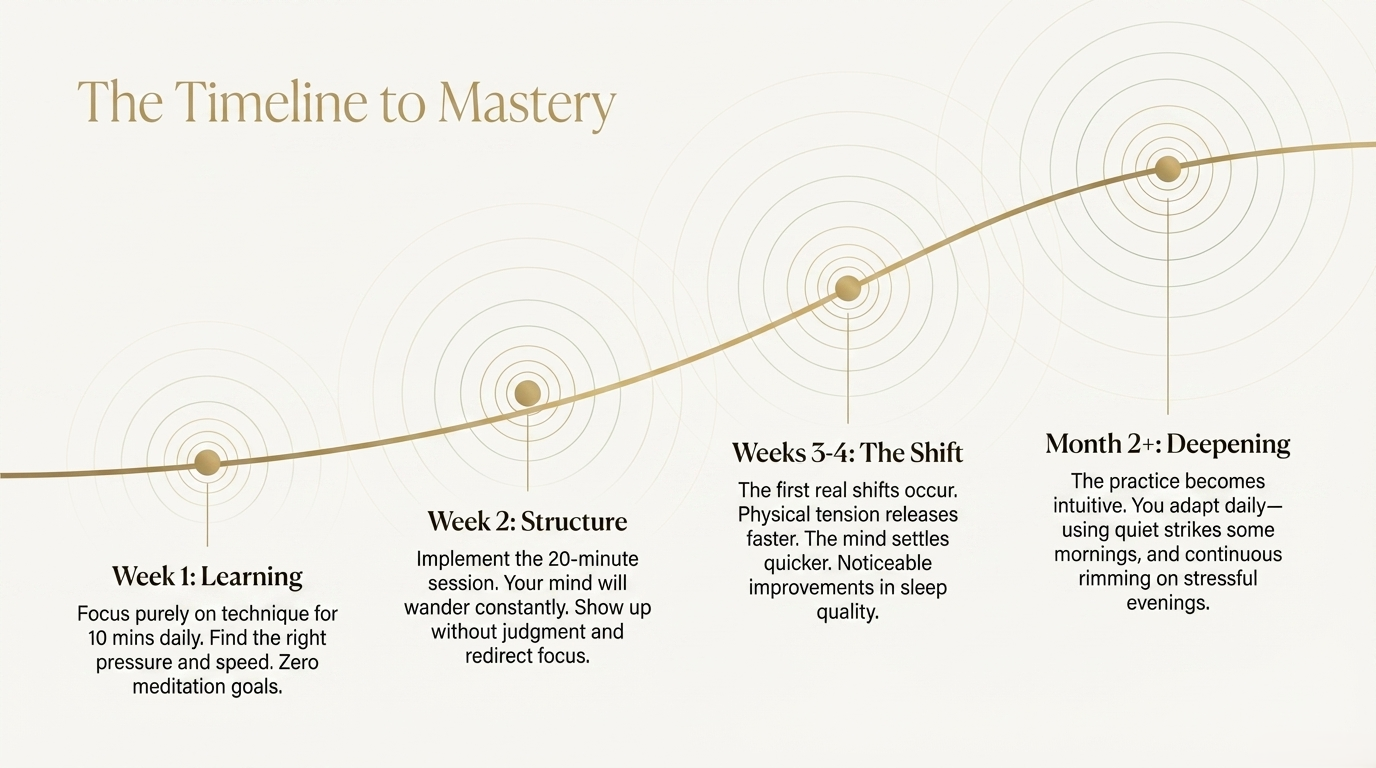
Building a Daily Practice: What to Expect Week by Week
Consistency matters far more than duration. Ten minutes every day produces deeper results than one hour once a week. Here is what most practitioners experience as a realistic timeline.
Week 1 — Learning the instrument
Focus entirely on technique. Practice striking and rimming for 10 minutes daily without any meditation goal. Just learn how the bowl responds to different pressure and speed. You will notice the sound becoming noticeably richer as you find the right touch.
Week 2 — Adding intention
Begin following the 20-minute session structure above. The mind will be busy. This is fine and expected. Your only job is to return attention to the sound each time you notice it has wandered. Do not judge the quality of your sessions — simply show up each day.
Weeks 3 and 4 — First real shifts
Most practitioners notice something shift between days 14 and 21. The mind settles more quickly when the bowl begins. Physical tension releases more readily. Sleep quality often improves noticeably during this period. These are the most commonly reported effects of a consistent singing bowl practice.
Month 2 and beyond — Deepening
After 30 days of daily practice, you will find yourself naturally adapting the session to what you need each day. Some mornings call for five quiet strikes and silence. Some evenings call for twenty minutes of continuous rimming. The bowl becomes a genuine companion in practice — something you understand from the inside rather than simply follow instructions about.
Frequently Asked Questions
Start with 10–15 minutes daily. This is long enough to experience a genuine shift in your mental state but short enough to build the habit without resistance. Gradually extend to 20–30 minutes as the practice becomes established. Many experienced practitioners find 20 minutes daily more effective than longer, less frequent sessions.
Use the padded end for striking — it produces a softer, warmer tone without a harsh attack. Use the wooden side for rimming — it creates better friction against the metal rim, which is what sustains the singing sound. Some mallets have suede wrapped around the wood, which works well for both techniques. Experiment with both ends on your specific bowl to find what produces the richest sound.
Yes, but with a modification. If lying down, place the bowl on its cushion on the floor beside you or on your sternum (for smaller bowls only). You cannot hold and play the bowl effectively while lying down, but you can have someone else play it over your body, or you can strike it and then set it down before lying back. Many sound healing sessions are conducted with the recipient lying down while the practitioner plays.
This is completely normal and actually one of the beautiful qualities of a handmade singing bowl. The sound varies slightly based on the temperature and humidity of the room, how dry or oily your hands are, how recently the bowl was last played, and subtle variations in your touch and pressure. Over time, you will learn to read these variations and adjust your technique accordingly. Many practitioners find that their bowl sounds best after 5–10 minutes of playing, as the metal warms slightly.
There is no single prescribed breathing method. Most practitioners find that their breath naturally deepens and slows when the bowl is playing, without any deliberate effort. If you want to add a breathing intention, the simplest approach is to inhale during the strike and exhale as the sound fades — letting the natural rhythm of the bowl pace the breath. Avoid forcing deep breaths, which can create tension and work against the relaxation the bowl naturally induces.
The most reliable indicators are practical and physical: your breath deepens within the first few minutes of playing, areas of physical tension soften noticeably, and you feel genuinely quieter mentally at the end of a session than at the beginning. Over weeks, you may notice better sleep, a lower baseline stress level, and a greater ability to return to calm quickly after difficult moments. These effects are cumulative — they build gradually with consistent daily practice.
Ready to begin your practice?
Every Buddha Chime bowl is handmade by Nepali artisans in Kathmandu.
Each comes with cushion and mallet — everything you need to start today.
A Tibetan singing bowl is one of the most accessible and powerful meditation tools you can own — but like any instrument, it rewards a little technique. Whether you are picking up a bowl for the first time or looking to deepen a practice you have already started, this step-by-step guide covers everything: how to hold it, how to play it, how to build a full session, and the most common mistakes to avoid.
Before You Begin: Setting Up Your Space
The quality of your meditation session begins before you even touch the bowl. A few minutes of preparation makes the difference between a distracted session and one that drops you into genuine stillness.
Choose a quiet space
Find a room where you will not be interrupted for at least 15–20 minutes. Turn off notifications on your phone or put it in another room entirely. Background noise — music, television, traffic — will compete with the bowl's sound and pull your attention away from the vibration.
Prepare your body
Sit cross-legged on the floor, on a cushion, or upright in a chair — whichever allows you to keep your spine straight without strain. Avoid lying down when first learning; it is easy to drift into sleep rather than meditation. Take three slow, deep breaths before you pick up the bowl. Let each exhale release any tension from your shoulders and jaw.
Set your intention
Before playing, take a moment to decide why you are sitting. It does not need to be elaborate — "I want to feel calmer" or "I am releasing today's stress" is enough. Intention focuses your attention, which significantly deepens the effect of the sound. Many practitioners simply say their intention aloud once before they begin.
Place your bowl correctly
Rest the bowl on your open, flat palm — fingers together, thumb resting alongside them. Do not grip the bowl or curl your fingers up around the sides. Any contact between your fingers and the bowl's body will dampen the vibration and shorten the ring. If the bowl is large (8 inches or more), place it on its cushion on the floor in front of you rather than in your hand.
The Two Techniques: Striking and Rimming
There are two fundamental ways to play a Tibetan singing bowl. Both are useful in meditation, and most experienced practitioners use them together within a single session.
Striking produces a single, clear note that rings and slowly fades. It is the most natural starting point and requires almost no practice.
- Hold the bowl flat on your open palm
- Hold the mallet near the middle of the handle
- Strike the upper outer rim with a smooth, outward wrist motion — not a downward hit
- Let the mallet bounce off immediately — do not press it against the bowl
- Allow the note to fully decay before striking again
Rimming produces the sustained "singing" sound the bowl is named for. It takes more practice but creates the most immersive meditative experience.
- Strike the bowl once to start the vibration
- Immediately move the mallet to the outer rim
- Press gently — use the weight of your arm, not forced pressure
- Move the mallet slowly clockwise in a continuous circle
- Keep your wrist straight — the motion comes from your whole arm
"The bowl does not ask you to be skilled. It asks you to be present. The sound reveals exactly where your attention is."
— Buddha Chime Artisans, Kathmandu, NepalStep-by-Step: A Complete 20-Minute Meditation Session
Here is a full beginner-friendly session you can follow exactly as written. With practice, you will naturally adapt it to your own rhythm.
| Time | Activity | What to Do |
|---|---|---|
| 0:00 – 2:00 | Arrive & breathe | Sit comfortably, close your eyes, take 10 slow breaths. Do nothing with the bowl yet. Let the body settle. |
| 2:00 – 3:00 | Set intention | Silently state your intention for this session. One sentence is enough. Breathe into it. |
| 3:00 – 4:00 | Opening strike | Strike the bowl three times, slowly. Allow each ring to fully fade before striking again. These three strikes mark the official beginning of your session. |
| 4:00 – 12:00 | Main meditation | Choose one approach: (A) Strike every 30–60 seconds and follow each ring into silence with your full attention. Or (B) Rim the bowl continuously for 2–3 minutes, then rest in silence for 2–3 minutes. Repeat. Follow whatever feels most natural. |
| 12:00 – 17:00 | Silent sitting | Place the bowl down. Sit in complete silence. This integration period is as important as the playing — the nervous system continues to shift after the sound stops. Do not rush this. |
| 17:00 – 19:00 | Body scan | Gently bring awareness to your body from head to toe. Notice any areas of warmth, tingling, or release. No need to analyze — simply observe. |
| 19:00 – 20:00 | Closing strike | Strike the bowl once more — a single, final ring — to close the session. Bow slightly if it feels right. Open your eyes slowly. |
How to Use Your Bowl for Different Types of Practice
The same bowl can serve many different purposes depending on how you use it. Here are the most effective applications for each style of practice.
Mindfulness meditation
Strike once. Use the fading ring as your meditation object — follow the sound from full volume to complete silence. When the mind wanders, notice it and return to the sound. Repeat every 1–2 minutes.
Breathwork
Strike at the start of each inhale. Let the ring be the length of your breath cycle. The sound gives the breath a rhythmic anchor that deepens the practice naturally.
Chakra meditation
Use a bowl tuned to the chakra you are working with. Place it near the corresponding body area. Rim for 2–3 minutes, then place hands on that area in silence. Move upward through the chakras.
Sleep preparation
15–20 minutes before bed, lie down and rim the bowl softly for 3–5 minutes. Do not try to meditate — simply let the sound slow your breathing. Allow yourself to become drowsy.
Yoga practice
Strike at the beginning of class to center the room. Strike again at savasana. The sound gives students a clear sensory boundary that deepens their transition into stillness.
Sound healing
Have the recipient lie down with eyes closed. Move the bowl slowly over the body at a distance of 6–12 inches, rimming continuously. Focus on areas of reported tension or discomfort.
Common Mistakes and How to Fix Them
Most beginners encounter the same handful of challenges. Here is what goes wrong and exactly how to correct it.
You are pressing too hard. Excess pressure dampens the vibration. Lighten your touch significantly — use only the weight of the mallet itself against the rim. Think of it as guiding rather than pushing. Also check your speed: too fast kills the tone. Slow down to roughly one revolution every 3–4 seconds.
Your fingers are touching the bowl's body. Even fingertip contact significantly dampens the ring. Flatten your palm completely — the bowl should rest only on the flat skin of your hand with no finger contact on the bowl's sides or bottom.
You are striking too hard, or striking at the wrong angle. Use a lighter, more glancing strike — the motion should be a smooth outward flick of the wrist, not a downward hammer. If the bowl sits on a hard surface, place the cushion underneath it first.
This is the most common beginner frustration, and it always resolves with patience. Start by striking the bowl firmly, then immediately place the wooden side of the mallet (not the padded end) against the rim. Move slowly — slower than feels natural. The sound will emerge within a few rotations once you find the right pressure and speed combination.
This is normal and expected — especially in the first weeks. Do not try to stop thoughts; simply redirect attention to the sound each time you notice the mind has wandered. The bowl makes this easier than silent meditation because the sound gives the mind a concrete object to return to. Each time you notice and return, that is a successful moment of practice.
You will know the session is working when you notice: the sound feels like it is inside the body rather than outside it, time feels different (shorter or longer than expected), and there is a natural settling or softening of breath and posture. These signs appear reliably within 2–3 weeks of daily practice.
Caring for Your Singing Bowl
A well-cared-for singing bowl improves with age. The metal develops a patina that many practitioners believe deepens the tone and enriches the resonance over years of use. Basic care takes less than two minutes.
- After every session: Wipe the bowl with a soft, dry cloth to remove oils from your hands. Skin oils can dull the metal surface over time.
- Storage: Always store the bowl on its cushion — never place it directly on a hard surface. The rim is the most acoustically sensitive part of the bowl and can be damaged by hard impacts.
- Cleaning: For a deeper clean, use a soft cloth lightly dampened with warm water. Dry immediately and thoroughly. Never submerge in water or use chemical cleaners.
- The mallet: Keep the mallet dry. If the suede or felt tip becomes hardened or compacted, gently loosen it with your fingers. A worn mallet tip produces a thinner, harsher tone.
- Temperature and humidity: Avoid leaving the bowl in direct sunlight or in very humid environments for extended periods. Extreme temperature changes can stress the metal alloy.
- What not to do: Never strike the bowl with anything other than its mallet. Never place hard objects inside the bowl. Never use abrasive cloths or metal polishes — they scratch and damage the tone.
Building a Daily Practice: What to Expect Week by Week
Consistency matters far more than duration. Ten minutes every day produces deeper results than one hour once a week. Here is what most practitioners experience as a realistic timeline.
Week 1 — Learning the instrument
Focus entirely on technique. Practice striking and rimming for 10 minutes daily without any meditation goal. Just learn how the bowl responds to different pressure and speed. You will notice the sound becoming noticeably richer as you find the right touch.
Week 2 — Adding intention
Begin following the 20-minute session structure above. The mind will be busy. This is fine and expected. Your only job is to return attention to the sound each time you notice it has wandered. Do not judge the quality of your sessions — simply show up each day.
Weeks 3 and 4 — First real shifts
Most practitioners notice something shift between days 14 and 21. The mind settles more quickly when the bowl begins. Physical tension releases more readily. Sleep quality often improves noticeably during this period. These are the most commonly reported effects of a consistent singing bowl practice.
Month 2 and beyond — Deepening
After 30 days of daily practice, you will find yourself naturally adapting the session to what you need each day. Some mornings call for five quiet strikes and silence. Some evenings call for twenty minutes of continuous rimming. The bowl becomes a genuine companion in practice — something you understand from the inside rather than simply follow instructions about.
Frequently Asked Questions
Start with 10–15 minutes daily. This is long enough to experience a genuine shift in your mental state but short enough to build the habit without resistance. Gradually extend to 20–30 minutes as the practice becomes established. Many experienced practitioners find 20 minutes daily more effective than longer, less frequent sessions.
Use the padded end for striking — it produces a softer, warmer tone without a harsh attack. Use the wooden side for rimming — it creates better friction against the metal rim, which is what sustains the singing sound. Some mallets have suede wrapped around the wood, which works well for both techniques. Experiment with both ends on your specific bowl to find what produces the richest sound.
Yes, but with a modification. If lying down, place the bowl on its cushion on the floor beside you or on your sternum (for smaller bowls only). You cannot hold and play the bowl effectively while lying down, but you can have someone else play it over your body, or you can strike it and then set it down before lying back. Many sound healing sessions are conducted with the recipient lying down while the practitioner plays.
This is completely normal and actually one of the beautiful qualities of a handmade singing bowl. The sound varies slightly based on the temperature and humidity of the room, how dry or oily your hands are, how recently the bowl was last played, and subtle variations in your touch and pressure. Over time, you will learn to read these variations and adjust your technique accordingly. Many practitioners find that their bowl sounds best after 5–10 minutes of playing, as the metal warms slightly.
There is no single prescribed breathing method. Most practitioners find that their breath naturally deepens and slows when the bowl is playing, without any deliberate effort. If you want to add a breathing intention, the simplest approach is to inhale during the strike and exhale as the sound fades — letting the natural rhythm of the bowl pace the breath. Avoid forcing deep breaths, which can create tension and work against the relaxation the bowl naturally induces.
The most reliable indicators are practical and physical: your breath deepens within the first few minutes of playing, areas of physical tension soften noticeably, and you feel genuinely quieter mentally at the end of a session than at the beginning. Over weeks, you may notice better sleep, a lower baseline stress level, and a greater ability to return to calm quickly after difficult moments. These effects are cumulative — they build gradually with consistent daily practice.
Ready to begin your practice?
Every Buddha Chime bowl is handmade by Nepali artisans in Kathmandu.
Each comes with cushion and mallet — everything you need to start today.


Start writing here...